We need fresh an ubuntu srv 20.04 with ssh only, pls prepare him first.
Reference:
- Docs for Grafana:
https://grafana.com/docs/grafana/latest/getting-started/getting-started-prometheus/ - Docs for Prometheus:
https://prometheus.io/docs/prometheus/latest/configuration/configuration/#scrape_config
1. Install Grafana:
sudo apt-get install -y apt-transport-https
sudo apt-get install -y software-properties-common wget
wget -q -O - https://packages.grafana.com/gpg.key | sudo apt-key add -
echo "deb https://packages.grafana.com/oss/deb stable main" | sudo tee -a /etc/apt/sources.list.d/grafana.list
After you add the repository:
sudo apt-get update
sudo apt-get install grafana
To start the service and verify that the service has started:
sudo systemctl daemon-reload
sudo systemctl start grafana-server
sudo systemctl status grafana-server
sudo systemctl enable grafana-server.service
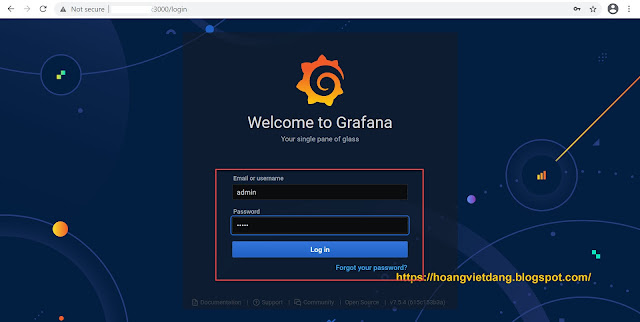
To log in to Grafana for the first time:
Open your web browser and go to http://X.X.X.X:3000/ . On the login page, enter admin for username and password ( default: admin / admin )
If login is successful, then you will see a prompt to change the admin's password.
Its time to create first dashboard
Click the + icon on the left panel, select Create Dashboard, and then click Add An Empty panel
Select -- Grafana -- under query tab > click Apply
Fill dashboard name then click save
Disable anonymous access on our Grafana server. Change parameter look like bellow in Grafana configuration file:
[auth.anonymous]
# enable anonymous access
enabled = false
wget https://github.com/prometheus/prometheus/releases/download/v2.26.0/prometheus-2.26.0.linux-amd64.tar.gz
tar xvzf prometheus-2.26.0.linux-amd64.tar.gz
useradd -rs /bin/false prometheus
Copy prometheus promtool to /usr/local/bin
cd prometheus-2.26.0.linux-amd64
cp prometheus promtool /usr/local/bin
Set permissions
chown prometheus:prometheus /usr/local/bin/prometheus
Create folder /etc/prometheus folder for Prometheus and move the console files, console libraries and the prometheus configuration file to this folder.
mkdir /etc/prometheus
cp -R consoles/ console_libraries/ prometheus.yml /etc/prometheus
Create a data folder for prometheus:
mkdir -p /data/prometheus
Set permission on both folders /data/prometheus & /etc/prometheus
chown -R prometheus:prometheus /data/prometheus /etc/prometheus/*
Create a new prometheus.service
cd /lib/systemd/system
touch prometheus.service
vi prometheus.service
then paste parameters bellow into this file:
[Unit]
Description=Prometheus
Wants=network-online.target
After=network-online.target[Service]
Type=simple
User=prometheus
Group=prometheus
ExecStart=/usr/local/bin/prometheus \--config.file=/etc/prometheus/prometheus.yml \
--storage.tsdb.path="/data/prometheus" \
--web.console.templates=/etc/prometheus/consoles \
--web.console.libraries=/etc/prometheus/console_libraries \
--web.listen-address=0.0.0.0:9090 \
--web.enable-admin-apiRestart=always
[Install]
WantedBy=multi-user.target
Enable at startup, and start Prometheus service.
systemctl enable prometheus
systemctl start prometheus
systemctl status prometheus
At this time you can access to your prometheus with the link : http://X.X.X.X:9090/
wget https://github.com/prometheus/node_exporter/releases/download/v1.1.2/node_exporter-1.1.2.linux-amd64.tar.gztar xvzf node_exporter-1.1.2.linux-amd64.tar.gzcd node_exporter-1.1.2.linux-amd64cp node_exporter /usr/local/binuseradd -rs /bin/false node_exporterchown node_exporter:node_exporter /usr/local/bin/node_exportercd /lib/systemd/systemtouch node_exporter.service
vi node_exporter.service
[Unit]Description=Node ExporterWants=network-online.targetAfter=network-online.target[Service]Type=simpleUser=node_exporterGroup=node_exporterExecStart=/usr/local/bin/node_exporter \--collector.mountstats \--collector.logind \--collector.processes \--collector.ntp \--collector.systemd \--collector.tcpstat \--collector.wifiRestart=always[Install]WantedBy=multi-user.target
Enable node exporter:
systemctl daemon-reload
systemctl enable node_exporter
systemctl start node_exporter
then check everything is ok:
journalctl -f -u node_exporter.service
curl http://localhost:9100/metrics
curl http://localhost:9100/metrics | grep "node_"
Add 'localhost:9100' to Prometheus configuration file
vi /etc/prometheus/prometheus.yml
systemctl restart prometheus
at this moment, you can see http://localhost:9100/metrics is UP when access to http://X.X.X.X:9090/targets
4. Import Grafana Dashboard to our server:
Access to grafana at http://X.X.X.X:3000 > Click Menu + > select Import
Input id 10242 then click Load button
Select Prometheus data source then click Import
Great, now you can play with a ton of data visualization :)


No comments:
Post a Comment