Task 1: Create and edit a GPO on windows server 2019
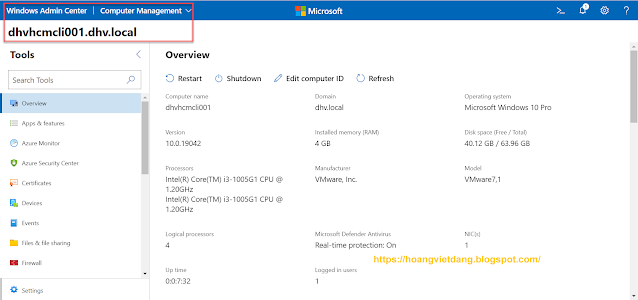
- Scenario: I've installed Windows Admin Center & already added one Window 10 PC client to management on WAC. But i can't connect to client from WAC due to the service WinRM has not start & got deny from Window Defender Firewall on that client. If we have a hundred clients we can not goes to individual PC to config him, so we use GPO to solve problem.
Task 2: Test override policy: phase 1 create standard police apply on top domain , phase 2 create new one override policy apply at OU level. Apply, verify settings on the client computer & verify the order of precedence.
Let's start !
Task 1: Create and edit a GPO on windows server 2019
Scenario 1
As i mention above from my WAC can't connect to windows PC client so we should create some policies on DC to solve problem.
Step 1: First, we need to create a Group Policy object for your domain
- From the Server Manager on DC, open Group Policy Management under Menu Tools.
- At Group Policy Object container create new policy. For me i've input the name: DHV Allow WAC Connect To Window 10
- Click OK
Next, edit the new Group Policy object you just created.
Step 2: Allow remote server management through WinRM
- Right-click on the new DHV Allow WAC Connect To Window 10 Group Policy Object and select Edit
- From the menu tree, click Computer Configuration > Policies > Administrative Templates: Policy definitions > Windows Components > Windows Remote Management (WinRM) > WinRM Service
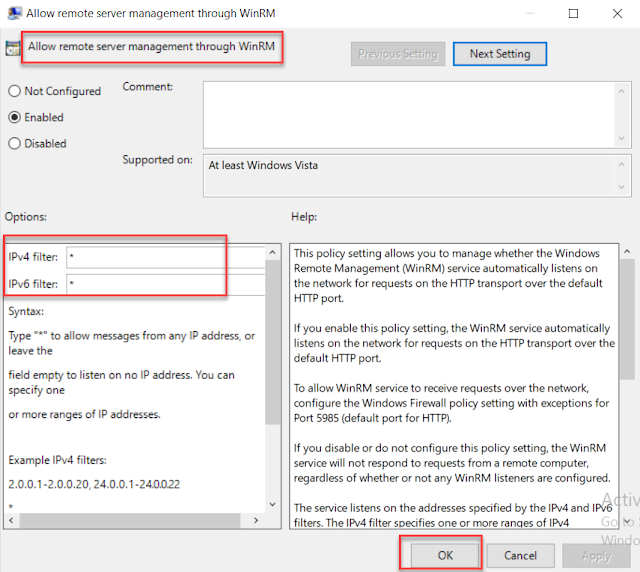
- Right-click on Allow remote server management through WinRM and click Edit
- Select Enabled to allow remote server management through WinRM.
- Enter an asterisk (*) into each field IPv4 & IPv6 (You can specify allow one or more ranges of IP addresses. Example IPv4 filters: 2.0.0.1-2.0.0.20, 24.0.0.1-24.0.0.22 )
- Click OK.
- From the Group Policy Management Editor window, under Computer Configuration > click Preferences > Control Panel Settings > Services.
- Right-click on Services and select New > Service.
- Select Automatic at the startup.
- input WinRM at the service name.
- Select Start service at the service action.
- All remaining details can keep defaults. Click OK.
- From the Group Policy Management Editor window, under Computer Configuration > Policies > Administrative Templates: Policy definitions > Network > Network Connections > Windows Defender Firewall > Domain Profile.
- Right-click on Windows Defender Firewall: Allow ICMP exception and click Edit.
- Select Enabled.
- Check Allow inbound echo request.
- Click OK.
- From the menu tree, click Computer Configuration > Policies > Windows Settings > Security Settings > Windows Defender Firewall with Advanced Security > Windows Defender Firewall with Advanced Security > Inbound Rules.
- Right-click on Inbound Rules and click New Rule.
- Select Predefined.
- Select Windows Remote Management from the list of services.
- Click Next.
- Uncheck the Public rule. Keep the Domain, Private rule checked.
- Click Next.
- Leaving the defaults, click Finish.
- Close the Local Group Policy Editor window
- From Group Policy Management window, select on OU that client belong
- Right-click then select Link an Existing GPO ...
- Select DHV Allow WAC Connect To Window 10 policy then click OK
- From the Server Manager on DC, click Group Policy Management under Menu Tools.
- At Group Policy Object container create new policy. input the name: DHV Standard Policy
- Click OK
- Right-click on DHV Standard Policy and then select Edit.
- In the Group Policy Management Editor window, on the navigation pane, expand User Configuration, expand Policies, expand Administrative Templates, and then select System.
- Double-click the Prevent access to registry editing tools select Enabled, and then select OK.
- On the navigation pane, expand User Configuration, expand Policies, expand Administrative Templates, expand Control Panel, and then select Personalization.
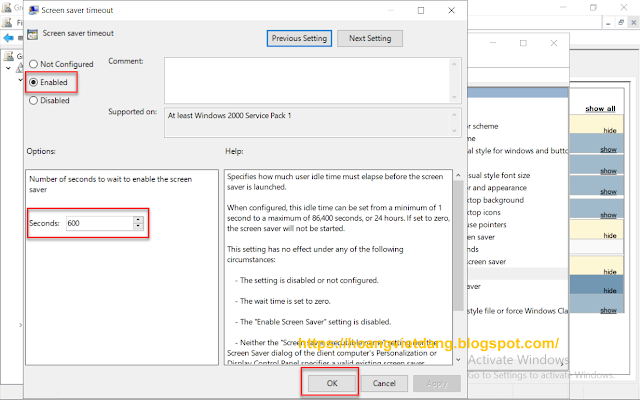
- On the details pane, double-click or select the Screen saver timeout, select Enabled. In the Seconds text box, enter 600, and then select OK.
- Double-click Password protect the screen saver policy select Enabled, and then select OK.
- Close the Group Policy Management Editor window.
- From Group Policy Management window, select dhv.local
- Right-click on its then select Link an Existing GPO ...
- Select DHV Standard Policy policy then click OK
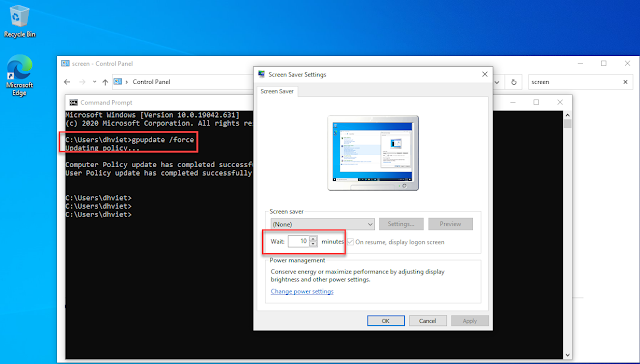
- Open command prompt then do gpupdate on both DC & client. Sometimes you need to reboot client to force apply new policies.
- Switch to dhvhcmcli001 client (windows 10 inside & alreadu joined domain dhv.local), and then sign in as dhv\dhviet with the password.
- In the search box on the taskbar, enter Control Panel.
- In the Best match list, select Control Panel.
- In the search box in Control Panel, enter screen saver, and then select Change screen saver.
- In the Screen Saver Settings dialog box, notice that the Wait option is dimmed. You cannot change the time-out settings.
- On your Domain Controller, in Group Policy Management Console, expand Domains dhv.local, and then select the OU that client belong to (at my case the OU is DES-HCM-HO).
- Right-click or access the context menu for the DES-HCM-HO organizational unit (OU), and then select Create a GPO in this domain, and Link it here...
- In the New GPO dialog box, in the Name text box, enter Test Override GPO, and then select OK.
- On the details pane, right-click or access the context menu for the Test Override GPO, and then select Edit.
- In the console tree, expand User Configuration, expand Policies, expand Administrative Templates, expand Control Panel, and then select Personalization.
- Double-click the Screen saver timeout policy setting .
- Select Disabled, and then select OK.
- Close the Group Policy Management Editor window.
- In the Group Policy Management Console tree, select the DES-HCM-HO OU.
- Select the Group Policy Inheritance tab.


No comments:
Post a Comment