DHV, Ltd. is a large organization with complex requirements for network services. To help meet these requirements, you will deploy and configure DHCP so that it is highly available to ensure service availability. You will also set up DNS so that your client can have resolve DNS server in your local domain.
After complete this lab you can:
- Deploy and configure DHCP
- Deploy and configure DNS
I'll use 4 VMs for this lab
- DHVHCMSRV001 - PDC (Desktop Experience) with DNS interactive on ADDS, DHCP services already install & configured.
- DHVHCMSCORE001 - SDC (Window Server Core) with DNS interactive on ADDS, we will install DHCP on this server
- DHVHCMWAC001 - Windows Admin Center
- DHVHCMCLI001 - Windows 10 Client for testing
Task 1: Deploying and configuring DHCP
Step 1: Install the DHCP role
- Login to your Windows Admin Center then connect to DHVHCMSCORE001.dhv.local then sign in with your account.
- On the Tools pane, select Roles & features.
- In the Roles and features pane, select the DHCP Server check box, and then select Install
- Install Roles and Features page will appear, select check box Reboot the server automatically, if require, then click Yes.
- After install completed, refresh Windows Admin Center, select DHCP then click Install to install DHCP PowerShell (RSAT) tools.
Step 2: Authorize the DHCP server
- Switch to DHVHCMSRV001 (Primary Domain Controller).
- In Server Manager, select Notifications in the menu, and then select Complete DHCP configuration.
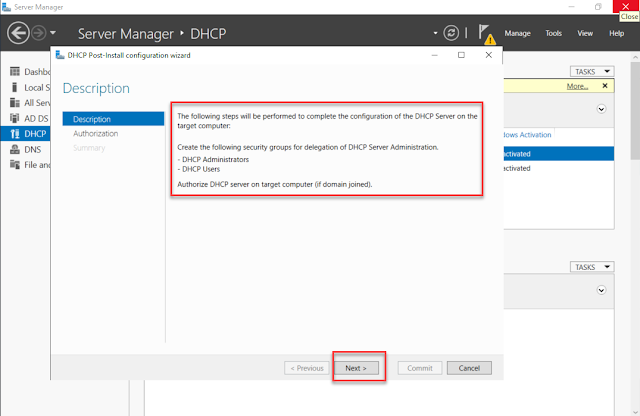
- In the DHCP Post-Install configuration wizard window, on the Description screen, select Next.
- On the Authorization screen, select Commit to use the dhv\Administrator credentials.
- When you complete both tasks, select Close.
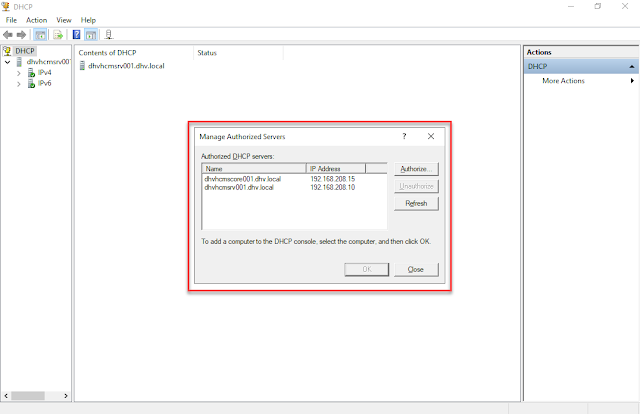
You can check DHCP server on DHVHCMSCORE001 has authorized by right-click on DHCP on DHCP console then select Manage authorized servers...
Step 3: Create Scope On DHVHCMSCORE001
- Login to your Windows Admin Center, connect to DHVHCMSCORE001.dhv.local then sign in with your account. In the Tools pane, select DHCP, and then select New scope.
- In the Create a new scope dialog box, enter the following information, and then select Create.
- Protocol: IPv4
- Name: For_Labroom
- Starting IP address: 192.168.209.128
- Ending IP address: 192.168.209.254
- DHCP client subnet mask: 255.255.255.0
- Router (default gateway): 1192.168.209.2
- Lease duration for DHCP clients, limited to : 1 day
- Because on WAC DHCP extension just only preview version so we can not config scope option for DHCP on WAC. So we switch back to DHVHCMSRV01 to do that
- At DHVHCMSRV01 in Server Manager, select Tools, and then select DHCP.
- In the DHCP window, select Action, and then select Add Server.
- In the Add Server dialog box, select This authorized DHCP server, and then select OK.
- In DHCP window, expand Scope [192.168.209.0] For_Labroom, and then select Scope Options.
- Select the Action menu, and then select Configure Options.
- In the Scope Options dialog box, select the 006 DNS Servers check box.
- In the IP address box, Add your DNS Server IP, in my case its 192.168.208.10 (PDC) & 192.168.208.15 (SDC) and then select OK.
You also configuring more scope option like NTP server, WINS server....at scope windows.
Step 4: Configure DHCP Failover
At this moment i have two scopes on 2 DHCP server so on this lab i will Configure DHCP Failover on scope For_Staff its handling by my PDC DHVHCMSRV001
- On DHVHCMSRV001, in the DHCP window, select IPv4, select the Action menu, and then select Configure Failover.
- In the Configure Failover window, verify that the Select all check box is checked, and then select Next.
- On the Specify the partner server to use for failover screen, in the Partner Server box, enter DHVHCMSCORE001.dhv.local, and then select Next.
- On the Create a new failover relationship screen, enter the following information, and then select Next.
- Relationship Name: DHCP PDC to SDC
- Maximum Client Lead Time: 1 hour
- Mode: Hot standby
- Role of Partner Server: Standby
- Addresses reserved for standby server: 5%
- State Switchover Interval: Disabled
- Enable Message Authentication: Enabled
- Shared Secret: DHV-DHCP-Failover
- Select Finish.
- In the Configure Failover dialog box, select Close.
- On DHCP console under dhvhcmsrv001.dhv.local, select IPv4, and then verify that only one scope is listed.
- Expand dhvhcmscore001.dhv.local, select IPv4, and then verify that two scopes are listed.
Maximum Client Lead Time: As an administrator, you must configure a percentage of the scope addresses to be assigned to the standby server. These addresses are supplied during the Maximum Client Lead Time (MCLT) interval if the primary server is down. Configure the MCLT parameter to specify the amount of time that a DHCP server should wait when a partner is unavailable before it assumes control of the address range.State switchover interval: A communication-interrupted state occurs when a server loses contact with its partner. Because the server has no way of knowing what is causing the communication loss, it remains in this state until the administrator manually changes it to a partner down state. You can enable automatic transition to partner down state by configuring the auto state switchover interval. The default value for this interval is 60 minutes.
If you want to Configure Failover for scope For_Labroom on DHVHCMSCORE001.dhv.local. All steps like above but take a note then: On the Specify the partner server to use for failover screen, in the Partner Server box, enter dhvhcmsrv01.dhv.local, select the Reuse existing failover relationships configured with this server (if any exist) check box.
Step 5: Verify DHCP functionality
- On dhvhcmcli001 windows 10 client , make sure he can get dynamic IP.
- Open CMD then enter ipconfig /all
- Verify then the DHCP server is 192.168.208.10 (dhvhcmsrv001.dhv.local)
- Disable ethernet interface on dhvhcmcli001 windows 10 client ( He will add you for administrator permission)
- Switch back to PDC dhvhcmsrv001, on DHCP console, at scope [192.168.208.0] For_Staff under dhvhcmsrv001.dhv.local, select Address leases Verify that dhvhcmcli001 is listed as here.
- double check dhvhcmcli001 is listed as Address Leases under scope [192.168.208.0] For_Staff under dhvhcmscore001.
- On DHCP console Select dhvhcmsrv001.dhv.local, right-click, select All Task, then select Stop.
- Switch to dhvhcmcli001 windows 10 client
- Right-click on Ethernet Adaptor then select Enable > in User Account Control page, enter your domain admin account/password , select OK
- After that Right-click on Ethernet Adaptor one more time click Status, then select Details... button.
- Now you can verify that the DHCP server is 192.168.208.15 (dhvhcmscore001.dhv.local)
Task 2: Deploying and configuring DNS
For deploy DNS interactive with ADDS you can check on another post:


No comments:
Post a Comment